# Shipping your orders in Orderwave
Orderwave provides a full-featured suite of tools to help you quickly ship orders.
When shipping in Orderwave, you follow these basic steps:
- Create a shipment batch
- This is a group of shipments that together make up a batch. In a batch, you can bulk-request shipping labels and packing slips to be created.
- Get shipping labels
- Create packing slips
- Merge packing slips
- Dispatch shipments
- This is the final step, that indicates that the shipment has left the warehouse and has begun transit. It also signifies that the shipment and order can be considered complete.
# Shipment batches
Shipments are a part of an order. When an order has been cleared to ship, either by a successful payment transaction, such as an Authorization or Sale, or by a user manually clearing the order to ship, the shipment will be queued in the BATCHING queue. Shipments that are in the BATCHING queue are eligible to be shipped, and are thus ready to be batched into a Shipment Batch.
A shipment batch is a group of shipments that are grouped together for the purpose of being packed in the warehouse.
# Customizing shipment batches
Often it is advantageous to group similar orders into a batch, so that your warehouse team can quickly pack the orders, make less mistakes, and spend less time pulling inventory items from the racks. Orderwave lets you customize the shipments that are pulled into a batch, by using search-filters on the shipments page.
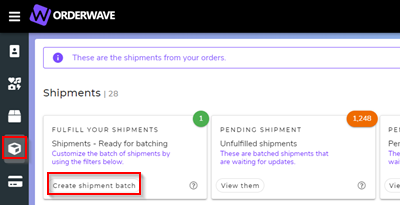
Using the search-filters, drill down to the shipments that you want to ship, and use the Create shipment batch button to create your batch. The search filters you have specified will be used to filter the shipments that get included into the batch.
# Automating batch creation
To automate batch creation, create a new Automated Task as an App Job with the oms/shipments bucket.
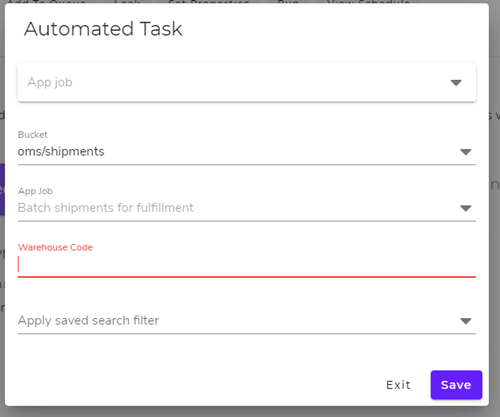
Specify the following in the automated task properties:
| Field | Description |
|---|---|
| Bucket | oms/shipments |
| App Job | Choose "Batch shipments for fulfillment" - this is the app job that batches shipments. |
| Warehouse Code | The warehouse code (identifier) that the batch should be created for. If you have not customized your fulfillers/warehouses in Orderwave, the default warehouse code is WH1. |
| Apply saved search filter | (Optional) If you want to customize the search-filter that is used to create this batch, choose a saved (and shared) filter from this list. If you leave this blank, all non-blocked shipments for this warehouse that are in the BATCHING queue will be pulled into this new shipment batch. |
# Viewing all shipment batches
To get to the shipment batches page and view all of the batches that have ever been created, navigate to .
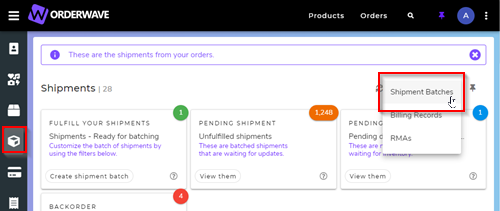
If you work with shipment batches, often, consider pinning the shipment batches page for easier access.
# Shipping labels
Once your shipments are in a shipment batch, you can start to request labels from the shipping carriers that are mapped to your shipments. You should have already mapped your shipments to a carrier connection, so Orderwave can successfully create shipping labels for you. Use the "Get Labels" button at the top of the shipment batch screen to get all of the labels for the shipment batch. The tracking number and estimated delivery date in Orderwave will automatically be saved on your shipments at this time.
When you produce a shipping label in Orderwave, Orderwave will automatically tag the shipment with the tag Label. This tag will help you easily identify shipments that have labels in multiple views, and customize your business rules.
Working with label errors
It is inevitable that some label requests to the carrier's API will produce an error, and no label. When this occurs, Orderwave will place shipments in a queue called CARRIER-ERROR. Orderwave has a pre-configured rule called DEBATCH-ERRORS that will automatically remove (debatch) these shipments from their batch if this occurs. In this way, you can create a clean batch of shipments and packing slips, and dispatch the shipments in a timely manner, and you can fix the errors that caused the rejected label at a later time, by working the CARRIER-ERROR queue.
# Packing slips
When your labels are fully created for the shipments in the batch, you should create packing slips for the shipments. Click the "Create Packing Slip Files" button at the top of the shipment batch screen to create packing slips for each shipment. Choose the packing slip template that you would like to use, and each packing slip will be created.
# Merge packing slips
Each shipment has its own PDF document for a packing slip — this is convenient for viewing individual packing slips for customers, however, it is not very convenient when printing packing slips. Orderwave lets you merge all of the individual shipment packing slips into one document that is easy to print. Click the "Merge Packing Slips" to merge each document together. The merged packing slips document will be available under the "Documents" section, titled "Packing slips for {batch number}". Download the merged document, and print it to your label or preferred printer.
# Dispatch shipments
The final step in shipping your shipments is dispatch. Dispatching your shipments tells Orderwave that the packages actually left the warehouse. It's the final confirmation that the shipment can be considered shipped.
To dispatch your shipments from the shipment batch, click the "Dispatch" button at the top of the shipment batch screen (the button will only appear if there are shipments to dispatch).
The importance of dispatch ⚠
You must dispatch your shipments in order for your orders to be marked as complete. Only dispatched orders trigger capture transactions on prior authorizations, and captured payments mean that you get paid.
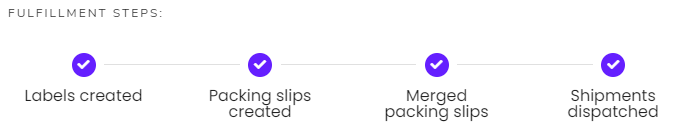
When your shipment batch:
- Has labels for each shipment
- Has packing slips for each shipment
- Has a merged packing slip document
- All records are dispatched You will see a completed steps diagram indicating that the batch done, and the shipment batch will be automatically marked as closed.
# Automating these steps
You can automate the above (creating the batch, plus getting shipping labels/packing slips/dispatch) using rules to create a workflow.
# Rule: Get labels
Create a new rule that will get shipping labels with the following properties:
| Item | Description |
|---|---|
| Bucket | oms/shipmentBatches |
| Trigger | attachedShipments - This is the process that attaches shipments to the shipment batch. It is triggered after the shipment batch is created, and after the shipments that were located were attached to it. |
| Matching properties | numberOfShipments more 0 - You only want to run this on shipment batches that contain shipments.user.username is WaveBot - You only want to run this on shipment batches that were automatically created by the WaveBot. |
| Action | "Get shipping labels for the shipments in this batch" |
# Rule: Create packing slips
Create a rule with the following properties that will create packing slips (this rule will be triggered by the previous rule):
| Item | Description |
|---|---|
| Bucket | oms/shipmentBatches |
| Trigger | getLabels - This is the action from the previous step. We want to kick-off the process to create the packing slips when it is done. |
| Matching properties | numberOfShipments more 0 - You only want to run this on shipment batches that contain shipments. |
| Action | "Create packing slip files for each shipment in this batch." with the packing slip template identifier (i.e. 8.5x11-Lower-Label) |
# Rule: Merge packing slips
Create a rule with the following properties that will merge the packing slip files into one file (this rule will be triggered by the previous rule):
| Item | Description |
|---|---|
| Bucket | oms/shipmentBatches |
| Trigger | createPackingSlipFiles - This is the action from the previous step. Now that the packing slip files have been created, we want to merge them together into one convenient file. |
| Matching properties | numberOfShipments more 0 - You only want to run this on shipment batches that contain shipments.numberOfShipmentsWithLabels more 0 - You only want to run this on shipment batches that contain shipments that have shipping labels.numberOfShipmentsWithLabels is [numberOfShipmentsWithPackingSlips] - You only want to run this on shipment batches that contain shipments that have an equal number of shipments that have shipping labels and packing slips.numberOfShipmentsWithPackingSlips is [numberOfShipments] - You only want to run this on shipment batches that contain shipments that have an equal number of shipments that have shipping packing slips and number of packages. |
| Action | "Merge all of the packing slip files into one PDF." |
Important
Only merge packing slips when all of the packages have labels and packing slips - this will help you be sure that you have not left out a shipment in the combined packing slip file.
# Rule: Dispatch shipments
Create a rule with the following properties that will dispatch the shipments optional (this rule will be triggered by the previous rule):
| Item | Description |
|---|---|
| Bucket | oms/shipmentBatches |
| Trigger | mergePackingSlips - This is the action from the previous step. Since we have all of the labels and packing slips for these shipments, we can save ourselves some work and dispatch them automatically. |
| Matching properties | numberOfShipments more 0 - You only want to run this on shipment batches that contain shipments. |
| Action | "Dispatch shipments with tracking numbers." |
Combined with an automated task to create batches, you can automate these steps to have all of the data your team needs to start pick/pack/ship in the warehouse.